How to Use Cricut Explore Air 2 [A Complete Guide]
Are you still wondering how to get started with Cricut Explore Air 2? Purchase the one but don’t know How to Use Cricut Explore Air 2 to create your DIY projects! Here is a complete guide on getting started with this wonderful machine.
But before knowing how it works, let’s first start with the basics, like understanding the device and its features.
Uses of Cricut Explore Air 2
Cricut Explore Air 2 is a wonderful personal crafting tool that comes in many pretty colors and encompasses many features to create DIY projects. This machine can be used wirelessly or with a USB cable to create awesome projects. Because of its versatile nature, the device works well in covering all crafting needs.
- The tool can be used to cut more than 100 different materials, starting from cardstock to vinyl, faux leather, and many more.
- With its writing feature, you can make fancy DIY invitations or write a quote.
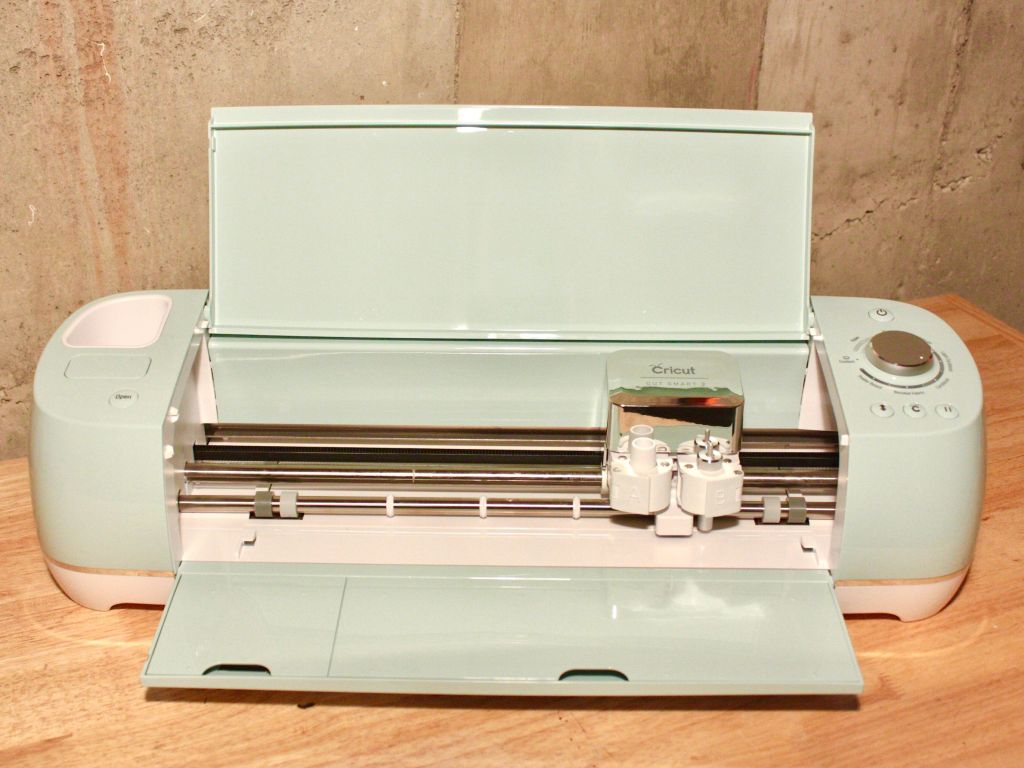
Navigating Cricut Explore Air 2 Machine
Follow the steps given below to navigate your Cricut Explore Air 2 device.
- Click on the open button to open the unit.
- You will find two storage components when you go to the bottom tray. The first component can be used to store your Cricut tools, and the other is for extra blades and housing.
- Cricut Explore Air 2 comes with a double tool holder. This makes the machine cut and either draw or score simultaneously.
- There is an additional holder on the left side of your Cricut. The device gives easy access to tools or pens while working on a project.
- If your machine has original Cricut design cartridges, they can still be used. All you need to do is plug it in. The Design Space Program will then recognize the cartridge and[e3] unlock the designs in your design space for you. Please note it will only work once per cartridge.
- There is a simple-to-use materials dial in the Cricut Explore Air 2. And in case the material is not listed, you set it to “Custom” and select the specific material on your computer’s screen.
- You will see a Power button, Loading button, Cricut Start button, and Pause button on the right side of Cricut.
- You can load or unload the mat with the loading button flashing with the Cricut.
- The power cord hooks into the back of your Cricut Unit.
- Cricut Explore Air 2 has built-in Bluetooth, but if you need to use a USB cable to connect, it will plug in on the back next to the power cord.
- After loading your mat, the Cricut start button flashes, and your project is ready to start.
- The power cord hooks into the back of your Cricut unit.
Cricut Explore Air 2 device has built-in Bluetooth, and if you need a USB to connect, it will plug in on the back next to the power Chord.
Creating Project: Cricut Design Space
Cricut Design Space is an online program through which you can access your designs from any computer, tablet, or phone. All you require is signing into your account.
How to Create Design Using Cricut Access
With Cricut Access Subscription, you can avail more than 1000 designs and fonts. You need to invest a few dollars in using it, but the investment is worth it. So, subscribe to Cricut Access if you plan to use different fonts and like to work on a few projects a month. There you can find a font you love and use all the time. And if you don’t want to create your image, you have the option to use the Cricut image library and find the perfect image for your project.
Cricut offers more than 60,000 images that start at just 99 cents. This way, you can upload your design, font, and ideas to your design space.
10 Easy-to-follow Steps for your First Project with a Cricut Explore Air 2
- First, place your material carefully on your adhesive cutting mat. Make sure you are lining up the left corner.
- Create your design, then.
- Once your design is ready, you send it to your Cricut Device; select the correct material on the dial of your Cricut Explore Air 2 machine.
- If you need to insert a pen or scoring tool before you start your project, the monitor on the Cricut will prompt you.
- To have a walkthrough machine’s checklist, follow the prompts as it will pause and ensure it’s ready to create.
- Once the Cricut loading button flashes machine is ready for you to load your mat, you need to press the flashing Cricut button to start.
- While your mat loads, ensure both sides are under the white tabs, keeping the mat straight.
- You will then see the loading button flashing again, indicating the project is done and ready for you to unload your mat.
- Now is the time to grab out your tools and begin to peel.
- Finally, leave your project on the mat and peel away materials that are not a part of your project.
Conclusion
If you have just purchased this cute mini box but don’t know how to get started, refer to the above definitive guide on How to Use Cricut Explore Air 2. All the steps above are explained thoroughly so that even a beginner can start with the device.
FAQs
What Type of Projects can be done on a Cricut Explore Air 2?
You can try various fun kinds of stuff on a Cricut Explore Air 2. Those who are artsy can have a lot of fun with this exciting device. The device is basically for arts and crafts and, most importantly, for personal enjoyment over anything else. Here is the list of projects you can enjoy on a Cricut Explore Air 2:
- Paper greeting cards
- Foam stamps
- Wood signs
- Pencil pouches
- Pantry labels
- Custom print shirts
- Custom cup and mug designs
- Felt bows
- Leather hair bows
And a lot more.
Do I get the Cricut Explore Air 2 by itself or as a bundle?
Cricut Explore Air 2 device can be purchased in a bundle with additional materials like Deep-Point Blade + Housing, Machine Mat Variety Pack, Scoring Stylus, Basic Tool Set, pen set, and a candy shop.


Comments
Post a Comment